jeudi 4 juillet 2013

Smooth sailing pants : how to turn the side zipper into a side button closure

Better late than never...Sorry for not posting at all in June but my work schedule was very, very tight and it was therefore harder to find time for blogging! Anyway, here you go! Watch out, this is a photo-heavy post!

I’ve already made a wintery, dark green wool version of the Smooth Sailing pants. I had hardly finished it when I started thinking, why not make one summer version? Or 2, or 3…? And then, why not using buttons instead of a zipper closure? Thing is, I didn’t know how to do that…however, after a bit of asking around and drafting, I figured out how to do it, and I can now propose you a little tutorial about how to convert a side zipper into a side button closure.
My method might not be very academic, but I can still share it with you, for what it’s worth. Hope you enjoy it!

How to convert a side zipper into a side button closure?

To begin with, we are going to draft a little pattern piece to make the button placket. Here are the measurements you will need to draw it:
  • Length (I chose the same length as the zipper advised in the pattern, i.e. 12cm/ 6in) – be careful to include your seam allowance in the length )
  • Width : you will have to take into account the diameter of your buttons, plus the space you want on each side of the buttons, plus the seam allowance. My pattern piece is thus 6cm wide at its widest point.
  • Button diameter (here, 2cm).

Here is my pattern. My buttons were 2cm wide and I decided to leave 1 cm on each side, plus one more cm (1/2 in) as a seam allowance. There are 2 cm between the top button and the upper edge of the pattern, seam allowance included, and 1.5 cm between each button. More space is left – about 3 cm – between the bottom button and the lower edge of the pattern. All in all, I used 5 buttons, including the one at the waistband.

You will cut 4 of these pattern pieces (following the grainline of the fabric), 2 of which being reinforced with fusible interfacing.


Then, take 2 of each pattern pieces - one of them interfaced, but not the other, and sew them, right sides together, following the curved line.

Grade your seam allowances, notch when needed, and then turn them to the right side.

Then proceed to put your pants together. Follow the pattern instructions until you have to insert the zipper.

Take your button placket pieces. The piece on which you will sew the buttons is going to be attached to the left back part of the pants, the other to the left front.
Pin one of your button plackets to the left front part of pants, right sides together, as shown below.


Stitch, then flip it to the wrong side of your pants.

Press, then trim the seam allowance that will end up facing the wrong side of the fabric...
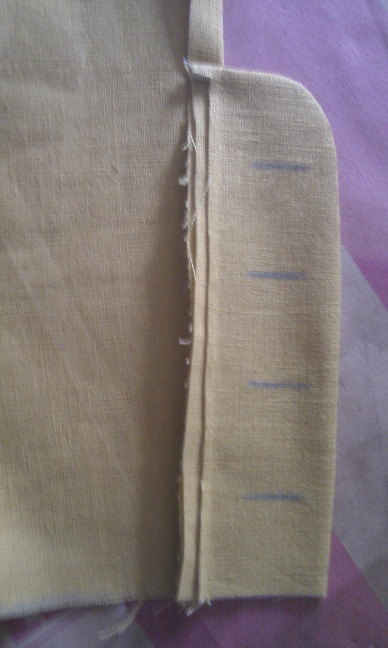
Flip to the wrong side once more...


Topstitch...


Here’s how it’s going to look like, once the buttonholes are made :

(Yes, I know, I handworked my buttonholes somewhat hastily and it shows...)
Now, take the back left part of your pants and attach the piece on which the buttons will be sewn. Pin it right sides together and stitch. Then, as you did previously, fold your seam allowance to the wrong side of your fabric and topstitch in place.

Here’s how it looks, once the buttons are sewn in place :


You can now proceed with your sewing, following pattern instructions, until you get to the waistband part.

As one of the sides of your button placket sticks out (the one which is going to carry the buttons), you will have to cut the waistband longer so you encase it within your waistband. As for me, I cut a 32 in. length for the waistband, but if you are not sure, the better is to make it longer than needed and then cut the excess. Interface your waistband as instructed on the pattern and carefully mark some folds, this will help you sew it in place afterwards :
You will first fold your waistband in the middle, lengthwise, and press. Then, you will fold the raw edges of your waistband, first at each end - fold about 1 cm towards the wrong side of your waistband and press. Do the same with the lowest part of the waistband, which will be attached to your pants. Then stitch your waistband as instructed on the pattern. Remember to tuck the raw edges inside at each end of your waistband and stitch it shut. You can topstitch your waistband if you like. I chose not to make the belt loops, so that the side button closure could be the main center of interest.

(Sorry, I stupidly forgot to take pictures to illustrate that part.)

Your pants will now be close to finished! All you’ve got left to do is make your buttonholes (4 on the placket + 1 on the waistband), either by machine or by hand, and then sew your buttons in place.
Watch out where you sew your buttons : when I made a muslin of my side-buttoned pants, I had overlapped the two parts of my button placket (buttonholes over buttons) and made marks with chalk inside the buttonholes to mark the spot for the buttons. Which I sewed, then, right on the middle of the lines I had drawn, only to find out later that the buttonholes were actually pulling on the buttons and that the 2 parts of my button placket did not overlap anymore - there was a gap of about 5mm where everything should have overlapped smoothly.
To avoid this, when I sewed the final garment, I did not sew my buttons right in the middle of the chalk lines - I slightly pushed them to the right. The picture below shows that the buttons are not quite sewn on the spot originally made for them (the little arrow is pointing that mark, which you can barely see).
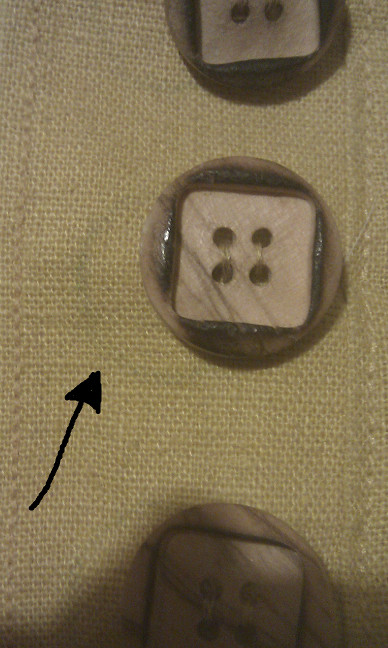
As a result, the 2 parts of my button placket overlap just as they should and there is no gap (see below!).

When you’ve reached this point, all you’ve got left to do is...well, hem your pants (with or without cuffs), wear them and be happy!      


Side note : I really can't understand why, but my cat keeps chewing at the buttons of these pants and trying to bite them off whenever I'm not looking. I swear, even when I'm just sitting on the couch, she's trying to eat those damn buttons - and she even succeeded in splitting one of them in 2. B****.

vendredi 31 mai 2013

Smooth Sailing : Take 2

Dressing for work can be a bit tricky for me. How could I find a style that's not too dressy (I work in a non profit organization and the dress code, if any, is very relaxed), still vintage but not too flashy either? Well, vintage casual seems to be the key!
And, speaking of vintage casual, Wearing History's Smooth Sailing pants totally fit the bill, which is why I've made a second pair!
Having made a muslin for the previous version (dark green wool ones), I did no fitting changes at all, but...I made one little change all the same : I replaced the side zipper with buttons. Paired with my fabric - a beautiful yellow linen - I think they add a touch of fun and give the pants a nice summery look!

Here's a picture, hastily snapped by my boyfriend as I had just finished it! Not the best pic ever, but  at least it shows that the pants fit, and you can see the button closure! 


On top of that, for - I think - the first time in my life, I've been wondering, before making these pants : what am I going to wear with them? As a result, I can wear these pants with something like 4 different pairs of shoes and 4 tops...Another great piece of "cake" added to my closet, then!
For those that are interested, I even made a tutorial on how to replace the side zipper with buttons, which I'll be posting shortly!

mardi 30 avril 2013

The "Psychobilly Freakout" shirt

After an uneventful - sewing-wise, that is - month of March, I'm back to show what I've made last - another shirt for my boyfriend, from what is now becoming a tried and true pattern - Kwik Sew 3484.
This one is actually much simpler than the first - which you can see here - but there's actually a reason for it : it was actually simply supposed to be a background for a patch! Consequentially, the fabric and the thread I used for the buttonholes (handworked...again!) were actually chosen to match the colors of the patch!
Here's the shirt itself...


And here's the justification for the title of this post!
The fabric is a poly/cotton blend in a dark/greyish blue, the buttons are grey metal and the buttonholes are made with red thread. I initially intended to topstitch with the same thread I used to make the buttonholes, but my machine would have none of it. On top of it, at first I thought topstitching was just a long, straight machine stitch done with a thicker thread and a specific needle...so I went to my sewing machine and sewing supplies dealer and asked for such a needle, to which he answered there were no such needles (although I do remember reading about it...) and that topstitching was actually a specific stitch! You can imagine I felt pretty dumb.

But that's how you learn I guess...I finally found out the setting on my machine and will be able to topstitch the hell out of my next project. Stay tuned for that :)

And now I'm going to leave you with some music. Hope you enjoy it!


mercredi 27 mars 2013

Happy birthday, blog!

Hello everybody!

Just dropping by to wish my blog a happy first birthday!
All I can say is, I'm far from being as regular as most of the other bloggers that I follow, and I may not deal with as many intersting topics...but I'm still here and I'll try to keep it going and make it better!

Have a nice day y'all!

mercredi 20 février 2013

Yours Truly 1 - Pants 0

...Well, of course, this doesn't mean that the pants, and, most of all, the pattern I used to make them, are rubbish. Definitely not. Quite the contrary. Au contraire.
I only mean this : I DID IT!!!!!!!!!!!!!!!!!!!!
My first pair of pants!

Here's the proof :

Crappy photo, blurry, my arms look like an old man's, there's all our mess in the background, and what kind of a face am I pulling??? But I thought, better a bad picture than no picture at all, and it's my only picture of these pants for the moment. I will update as soon as I manage to take a better one, I promise.


And here are the details :

Pattern : Pants from Wearing History Smooth Sailing 1930s Sport Togs - size pack B

Fabric : dark green 100% wool gabardine.

Notions : thread, 7 inch zipper, one button.

Any difficulties? No construction difficulties whatsoever, but of course I had to fiddle a bit to get the fit right, and for this I say a huge thank you to Lauren, the boss at Wearing History Patterns. My fabric was also a bit hard to press, but I used Tasha's recipe and it made the whole pressing business much easier. Also, I couldn't figure out how to insert the waisband in my 2 muslins - the waistband seemed shorter than my waist meaurement - but that was because I was doing it all wrong (RTFM!!!). I chose to cut the waistband one size bigger for my final version (32 in., a little bit big when you know my actual waist measurement is 28.5 in.)...as I was tired, I put the interfacing on the wrong side of the fabric (or should I say, on the right side, when it was actually supposed to be on the wrong side), sewed the underlap somewhat upside down...but after some cursing and wild seam ripper action, I finally got there, and I'm quite happy I did! My waistband is actually a bit too large and saggy, but oh well...live and learn! 

Wear again? I've already worn these pants 3 days in a row, and I will wear them again for sure. I was in need for some cake in my wardrobe, and this is just what they are : vintage-looking, office-friendly, comfy, easy to dress up or down...they tick every box!
Now I just have to find the best and cheapest way to care for it. Although there is enough room in these pants for me to breathe comfortably, and although I think it would still be OK even if they shrank a little bit, they shouldn't shrink too much either...I still want to be able to wear them!So I'm afraid I'll have to take a trip to the dry cleaners everytime I want to wash them. Well...I'll try not to put too much dirt on them!

Make again? Actually, I'm quite eager to be in March, which is when my fabric store is re-stocked with linen. I'd love to make a few more of these pants, probably in mustard yellow, peacock blue and terracotta orange/red.


lundi 14 janvier 2013

1st 2013 finished project - The Caribbean Seas Violet

Watch out : this post is going to contain some rather heavy self-congratulations.
Here it is, then, my first make for 2013! Just finished on January 2nd!


(apologies for this picture - on top of me being a bad photographer, the light in my appartment is terrible and the fabric doesn't come out as pretty as it really is. It actually looks more like what you can see on this pic.)
 Now, why a "Caribbean Seas Violet", do you ask? Well first because my fabric is Madras cotton, hence the "Caribbean"...and if you want the explanation for "Seas", why don't you look at the buttons?
Fishes!!!

Without further ado, here are the details of this project :

Pattern : Colette Patterns Violet.
Fabric :100% Madras cotton, from my local fabric store.

Notions : tropical fish-shaped buttons and piping.

Any difficulties ? The Violet pattern is actually marked for beginners, and if you follow the directions, it is indeed very easy and quick to make. However this project did not go without a few challenges : some that I set for myself - a fabric with a directionnal weave,  piping (which I'd never used before), and a little addition to the pattern in the form of cuffed sleeves - and one that was unexpected - having to do a SBA. I also decided to cut the back yoke on the bias and make handworked buttonholes. Furthermore, I tried to pay more attention to the finishings : although the main seams are simply finished with a zigzag stitch, my facing is bias-bound!
I did not rush myself through this project - although I think it all came together pretty quickly - and I'm really glad I did not, because for the first time I can look at something I've made and be really proud of myself. No clumsy seam finishing, perfectly inserted sleeves (if I do say so myself...), correct hems...Yes. I'm happy about it.

Here's a cuffed sleeve. I drafted the cuff pattern myself and I'm pretty happy of how the cuff matches the fabric below it!

And here's my bias-cut back yoke.
Wear again ? Certainly...once the appropriate weather for light blouses is back! I wore it once already, but because of the cold it remained hidden under my sweater. Duh.

Make again ? I can't say it yet...I still consider myself a beginner seamstress, and as such I'm most attracted to making new things, vs taking back an "old" pattern and making another version of a garment I already own. But this blouse was definitely fun and easy to make, and on top of it it made me more confident about some things - inserting sleeves for instance - and it enabled me to try new skills. So I'd say yes, I'll probably make another violet, even if it's not in a near future.
Oh, and if I make it again, maybe I'll try to make the collar slightly more narrow.

And you, what was your first 2013 sewing project?

mardi 8 janvier 2013

Happy New Year!

Well, that's not very original, but why not start 2013 by wishing anybody who'd stumble upon this humble blog a year 2013 as happy as possible?
I know it is also usual on sewing blogs to go back over the sewing projects of the year gone by...I had started doing this when I celebrated my 1st "sewversary" and will continue shortly.
As for goals to reach on this new year...I won't be giving myself too many goals to get to. Become more organized at work and at home would be a good thing to start with. And then...wait and see.

And I say it again, Happy New Year everybody!