Better late than never...Sorry for not posting at all in June but my work schedule was very, very tight and it was therefore harder to find time for blogging! Anyway, here you go! Watch out, this is a photo-heavy post!
I’ve already made a wintery, dark green wool version of the Smooth Sailing pants. I had hardly finished it when I started thinking, why not make one summer version? Or 2, or 3…? And then, why not using buttons instead of a zipper closure? Thing is, I didn’t know how to do that…however, after a bit of asking around and drafting, I figured out how to do it, and I can now propose you a little tutorial about how to convert a side zipper into a side button closure.
My method might not be very academic, but I can still share it with you, for what it’s worth. Hope you enjoy it!
How to convert a side zipper into a side button closure?
To begin with, we are going to draft a little pattern piece to make the button placket. Here are the measurements you will need to draw it:
Length (I chose the same length as the zipper advised in the pattern, i.e. 12cm/ 6in) – be careful to include your seam allowance in the length )
Width : you will have to take into account the diameter of your buttons, plus the space you want on each side of the buttons, plus the seam allowance. My pattern piece is thus 6cm wide at its widest point.
Button diameter (here, 2cm).
 Here is my pattern. My buttons were 2cm wide and I decided to leave 1 cm on each side, plus one more cm (1/2 in) as a seam allowance. There are 2 cm between the top button and the upper edge of the pattern, seam allowance included, and 1.5 cm between each button. More space is left – about 3 cm – between the bottom button and the lower edge of the pattern. All in all, I used 5 buttons, including the one at the waistband.
You will cut 4 of these pattern pieces (following the grainline of the fabric), 2 of which being reinforced with fusible interfacing.

Then, take 2 of each pattern pieces - one of them interfaced, but not the other, and sew them, right sides together, following the curved line. 
Grade your seam allowances, notch when needed, and then turn them to the right side.
Then proceed to put your pants together. Follow the pattern instructions until you have to insert the zipper.
Take your button placket pieces. The piece on which you will sew the buttons is going to be attached to the left back part of the pants, the other to the left front.
Pin one of your button plackets to the left front part of pants, right sides together, as shown below.
Stitch, then flip it to the wrong side of your pants.
Press, then trim the seam allowance that will end up facing the wrong side of the fabric...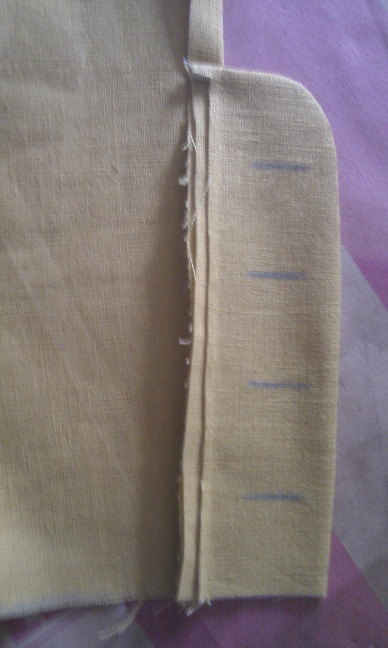
Flip to the wrong side once more...
Topstitch...
Here’s how it’s going to look like, once the buttonholes are made :
(Yes, I know, I handworked my buttonholes somewhat hastily and it shows...)
Now, take the back left part of your pants and attach the piece on which the buttons will be sewn. Pin it right sides together and stitch. Then, as you did previously, fold your seam allowance to the wrong side of your fabric and topstitch in place.
Here’s how it looks, once the buttons are sewn in place :

You can now proceed with your sewing, following pattern instructions, until you get to the waistband part.
As one of the sides of your button placket sticks out (the one which is going to carry the buttons), you will have to cut the waistband longer so you encase it within your waistband. As for me, I cut a 32 in. length for the waistband, but if you are not sure, the better is to make it longer than needed and then cut the excess. Interface your waistband as instructed on the pattern and carefully mark some folds, this will help you sew it in place afterwards :
You will first fold your waistband in the middle, lengthwise, and press. Then, you will fold the raw edges of your waistband, first at each end - fold about 1 cm towards the wrong side of your waistband and press. Do the same with the lowest part of the waistband, which will be attached to your pants. Then stitch your waistband as instructed on the pattern. Remember to tuck the raw edges inside at each end of your waistband and stitch it shut. You can topstitch your waistband if you like. I chose not to make the belt loops, so that the side button closure could be the main center of interest.
(Sorry, I stupidly forgot to take pictures to illustrate that part.)
Your pants will now be close to finished! All you’ve got left to do is make your buttonholes (4 on the placket + 1 on the waistband), either by machine or by hand, and then sew your buttons in place.
Watch out where you sew your buttons : when I made a muslin of my side-buttoned pants, I had overlapped the two parts of my button placket (buttonholes over buttons) and made marks with chalk inside the buttonholes to mark the spot for the buttons. Which I sewed, then, right on the middle of the lines I had drawn, only to find out later that the buttonholes were actually pulling on the buttons and that the 2 parts of my button placket did not overlap anymore - there was a gap of about 5mm where everything should have overlapped smoothly.
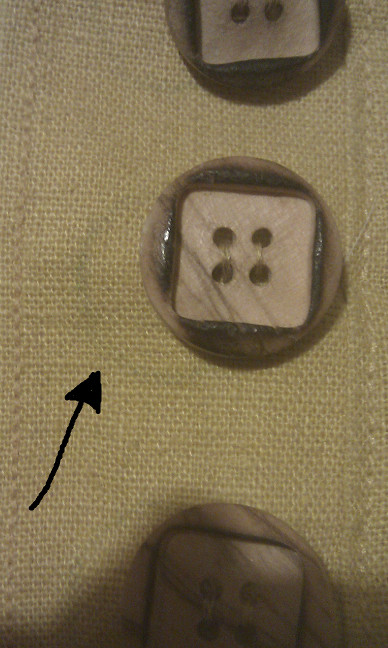
To avoid this, when I sewed the final garment, I did not sew my buttons right in the middle of the chalk lines - I slightly pushed them to the right. The picture below shows that the buttons are not quite sewn on the spot originally made for them (the little arrow is pointing that mark, which you can barely see).
As a result, the 2 parts of my button placket overlap just as they should and there is no gap (see below!).
When you’ve reached this point, all you’ve got left to do is...well, hem your pants (with or without cuffs), wear them and be happy!
Side note : I really can't understand why, but my cat keeps chewing at the buttons of these pants and trying to bite them off whenever I'm not looking. I swear, even when I'm just sitting on the couch, she's trying to eat those damn buttons - and she even succeeded in splitting one of them in 2. B****.