Affichage des articles dont le libellé est sewing. Afficher tous les articles

vendredi 17 juin 2016

Guess who's back?!

Hello?

...

*cough cough*

...

Anybody there?

Mind you, I wouldn't blame you. 7 months without a post! But I'm back now, and although I've spent some very intense seven months (training to become a webdeveloper, and now I've found a job in the same place where I've done my internship, woohoo!), that doesn't mean I have been without making!
What have I been making, you might ask?
Well...here it goes.
I've knit socks. A fair few pairs. Some for me, some not. And I'm not done with socks yet, so you can expect MOAR sock pictures on this blog!
Tardis Socks for my boyfriend...
Hermione's Everyday Socks for me...

...and the same for my sister...

Broken Seed Stitch socks...

Plus 3 other pairs I haven't photographed yet!


I've knit mittens.


I've knit a snood for my Gran...but unfortunately she didn't even have the time to wear it :,(


I've knit a Chuck sweater. And an Aiken dress.


I've sewn a Negroni for my boyfriend. That took me a looong time, mainly due to poor fabric choice I think. This sort of double cotton gauze/voile is sure to be lovely to wear in hot weather, but it was a real pain in the ass to sew!


I've also made myself a Moneta (this is my third, btw).


And I'm currently making a Kim dress and a Vianne cardi for the Outfit Along 2016.

Soooo...I guess you could say I'm back in the saddle, making-wise!


lundi 10 août 2015

What's been on my sewing table...

I haven't been posting a lot here lately, but believe me (and you would know if you follow me on Instagram ;) ), that was not for lack of sewing!
It's not always fun to be unemployed, but I must say that having more spare time is a change for the best...all the more so when it allows me to be more productive in terms of sewing! However, what I've sewn lately is more suitable for cooler weather and I haven't had the opportunity to take photos of me wearing those garments, so proper posts about these will come later.
So here's what I've been up to lately : 
I've made this Sencha blouse ...

Embroidered neckline...

And fun vintage square buttons!

 And this Chataigne skirt, which I think will be a great match for the above top...


Admittedly, the right side may look a bit plain...

But look at this wrong side! Sacred hearts, polkadot bias, lace-trimmed lining, oh my!
I've also ordered fabric for a Bombshell Swimsuit, which I may (or may not) start this week or next week...

And I'm also planning to make a Negroni shirt for my man.

And also, in other words, this is post #100! Woohoo!

vendredi 24 juillet 2015

Finished : An unplanned Moneta

Here's another sewing project which wasn't part of my plans for this summer/year, but it still happened!
Sorry for this unglamorous grocery bag! Although, I hadn't noticed until now, but it's got stripes, like my dress - and in that crappy artificial light, you could almost think the stripes on the dress are the same color as the bag's! So...not so unglamorous I'd say!
This is Colette Pattern's Moneta, made in a cotton jersey I got at Toto for something like 3€.
It's going to be nice to wear in this hot weather, but let me tell you folks...this fabric was a BITCH. As it's super thin and shifty, it took me hours to try and match stripes on my folded fabric, until I finally decided to cut it flat. As I thought it would be too much trouble to try and lay the skirt's pieces on my fabric and keep the stripes matchy, I decided to just cut two gathered rectangles. Even that, though, was not easy ; as I couldn't match my stripes at the selvedge (no matter how hard I tried!), I tried to make them match at the fold and in the middle of my fabric, by sticking random pins in the middle of my fabric (see picture below).

Can you spot the pins?
The final garment is a bit short compared with what I'm used to wear, and I think there is a thread tension problem around my sleeves and skirt hem - the upper thread - or should I say, one of my upper threads (how weird is that, seriously?!) - looks like it's too loose. 
Ugh, that's an ugly hem...

But I like it anyway, and I hope it's going to last the whole summer...at least! If not, I can still redo my hems!

jeudi 18 juin 2015

Finished : Red Striped Dolores

After sewing for my sister, and before moving to something bigger for the Outfit Along, I decided it would be great if I made a top, as I don't have that many handmade tops in my wardrobe. So I made a Dolores.


 A few years ago, I had tried to make a 50s style 2-seams wrap top after seeing Casey's version. As I was still a pretty inexperiences seamstress, I ended up with something rather awful and hardly wearable, and my top (which was basically no more than a rectangle of fabric - actually already folded as recommended in Dolores's cutting layout, how convenient! - with one seam connecting the selvedges and another perpendicular one) was soon put into the refashion pile...until this last week, when I decided to see if I had enough fabric to fit the Dolores pattern pieces onto it. Yay for refashioning and stashbusting!

Seriously, this pattern is so easy to make and takes so little time, making a Dolores almost feels like cheating or something. My fabric was not quite wide enough to fit the whole pattern, and the sleeves are shorter than they are supposed to be, but it still turns out pretty wearable in my opinion! And these short and wide sleeves are really perfect for the hot summer weather!

Also, as I recently picked up two pieces of striped jersey from Toto for a steal, you can expect other Doloresses in the future...at least one dress, and probably a top!

vendredi 5 juin 2015

Outfit Along is back!

Well...I'm in!

I'm going to knit Hetty in black Drops Paris, and sew a Lily in watermelon print (for the skirt and neckline flaps) with a solid black bodice. I also plan to modify the skirt and make it gathered, with patch pockets, instead of the pattern's slim skirt.

Fabrics, sewing pattern... and my Hetty, already started! I've knit the back, right and left front, and I'm about to tackle the body.
Head over to Andi or Lauren's blog if you want to know more about what's going on!

lundi 13 avril 2015

Finished : cigarette pants


Well, these took a long time to finish...and I can thank my sewing buddies for the fact that they're actually done now!


The pattern is B5895 - a "pattern by Gertie", which I had already used previously to make capri/pedal pushers.


Pocket detail - I used some scrap fabric remaining from one of my first ever sewing projects!


This was my first time using the rotary cutter I got for Christmas... and I don't want to go back to classical scissors!
One of the reasons why it took so long for me to finish is because I made a stupid mistake : I forgot that I had to be careful of the nap directrion, so I layed the front of the pants out on the fabric one way, and the back another way, and I found myself with a back and a front that looked as if they belonged to a different item of clothing...So I ripped everything off (I could have kicked myself, I had already assembled my pants - even made flat-felled seams on the inside leg -  and only had to sew the waistband!) and cut a new piece for the front of my pants.
Fortunately, this was one of these 5€-for-3-meters coupon from Les Coupons de Saint-Pierre, so I had plenty of fabric left...I could even cut a Chataigne skirt in what was left!

Now...I'm not used to talk about my life here, but I feel there's something I must say now.
Long story short, I've been dismissed from my job because of some disagreements with my employers. I'd like to take a training course before going back to any kind of job search, but training doesn't come out cheap and getting it funded by Pôle Emploi won't be easy. Which means stressfull times ahead for me. This is somewhat draining my energy and takes the fun out from things I like doing, like sewing.

Fortunately, I have some great sewing buddies, and we had planned a meeting : nine girls, sewing machines, sergers, food and drinks...everything you need to complete a project!
This meeting gave me the kick in the ass I needed to finish my pants, and I could even borrow a serger to get some proper seam finishes!


To conclude this post, I just wanted to say a big THANK YOU to all my sewing buddies...this meeting really was like a breath of fresh air to me! 
  

jeudi 26 février 2015

My adventures with cigarette pants

So, there you have it. My first big sewing project for 2015 is ON!
After some dithering about which pattern I could use, I finally settled on B5895, which I had already made before.
As I wanted to start afresh and correct whatever fit issues I might have had with my first version, I did a first muslin using the untouched pattern. And here it is!


I'd say it looks OK, both back (sorry, no picture of the back - I'm not equipped to take good pictures of my backside on my own!) and front, from the waist down to mid-thighs.
As evidenced on pic nr.2, the side seam is slightly pulled forwards when I get to the pocket area, so maybe I should taper the seam allowance to 1/2 in when I reach the top of the pocket on the side seam, and then gradually go back to 5/8 in.
I also think I should taper to a size 10 from mid-thighs down to the hem, to really get that "cigarette pants" look.
Also, I lengthened the legs a bit too much - I'll have to hack off a few inches as I want them to hit just above my ankles.

vendredi 9 janvier 2015

Sewing musings...What to sew next?

Now that 2014 is over, it's time to think about stuff to sew in 2015...So here are my inspirations. Some of these are just musings, other relate to fabrics/patterns I arleady have and should use.

Things I'm (more or less) sure to make sooner or later :
  • My first order - My sister gave me some dark green linen she'd had for some time, and asked if I could make something for her with it. We decided upon Deer and Doe's Airelle blouse. I'm really happy to get to do this for her!
  • Cigarette pants - I think i'm going to follow Tasha's example and use B5895, which I've already made, and some black corduroy I bought on purpose a few months ago;
  • I haven't got the pattern yet, but I'd love to make a Bronte top with the remnants from my Moneta and Dolores Dress;
  • Taking another shot at Sencha, using another piece of fabric my sis gave me - robin's egg-blue linen. Even though it's not my favorite color (a bit too washed-out for my taste), I think it could look cute if I can find pretty vintage buttons in a contrasting color (would cotton-candy pink or a pale yellow look too girly? Or would it be better with black or white?) and add some matching embroidery around the neckline ;
  • another Picnic blanket skirt ;
  • A Lily with modified skirt (probably a gathered skirt with patch pockets) in watermelon print ;
  • Maybe a Sorbetto to use the remains of dotted swiss and cotton voile from my Hawthorn.
Things I'm dreaming of, but not sure to make immediately :
  • I've been drooling over any patio/southwestern/square dancing dress I see on the web, and I've been thinking about a way to reproduce the look without using a (possibly very expensive, probably hard to find and likely not in my size) vintage pattern. I finally thought, why not use the Anna dress bodice (the V-shaped neckline version seems most obvious to me, but the bateau neckline could work too!) with a tiered skirt? I'm thinking black lightweight cotton (or linen, maybe) with ricrac or pompom trims...
  • Another Anna inspiration : I thought about making it in a blue and green tartan wool fabric. I guess the shorter version would make quite a sweet, office friendly dress...but the longer version could have a sort of a punk-ish edge to it depending on how you style it (I'm thinking boots + leather biker style jacket here). What would you think?
  • Now that I've completed the Hawthorn, I'm less scared of tackling Colette Pattern's Ceylon...but I've yet to find the right fabric for it. How about some black broderie anglaise? or dark green silk crepe?
  • Wearing History Overalls, another try? In a checked wool fabric, perhaps?
Well, that's eleven potential sewing projects, so that shoud be enough to keep me busy for the year to come.
Also, apart from the Bronte top, I'd have all the patterns I need to complete these projects in my stash. And I also already have the fabric for seven of these, so how about a stash-busting year?

Let's see if I can stick to it!

vendredi 19 septembre 2014

Perfect cigarette pants : Burda vs Cynthia Rawley

So...this may (or may not) be part of my FESA 2014 plans, but I'm currently on the lookout for the perfect high waisted late 50s style cigarette pants pattern. I already have one pattern that might be a likely candidate (Gertie's B 5895), but I sort of got the fit right for the length and I'm afraid to mess everything up if I try to make it longer (don't know if that sounds very clear)...so I'd rather start afresh with a pattern originally designed to make proper pants (as opposed to capri/pedal pushers length).

I have already ordered the fabric to make them (a black stretch corduroy from Les Coupons de Saint-Pierre) but I still can't decide on the pattern.

So, which one of these 2 contenders is going to win?


On the left, Burda

Pros :

  • Rather cheap, print-at-home pattern, so no need to wait,
  • Don't know what they'd look like in real life but I like the Brigitte Bardot styling, this is what I'd like to emulate.


Cons :

  • I've never sewn from a Burda pattern ;
  • I'm scared of having to add seam allowances and of their reputation about sizing.


On the right : Cynthia Rowley for Simplicity

Pros :

  • They're not looking that vintage-y to me (or at least not in the way i'd like them to) but i see great potential in them;
  • I like where the waist hits (higher than natural waist).

Cons :

  • I know it's a designer pattern, but 11$ sounds expensive for a Big 4 pattern, plus I'd have to pay for the shipping and wait till they get in my mail box...
  • There seems to be a pleat at the front and I'm not sure what it would look like on me...
So, which one would you choose ? Unless you'd suggest another pattern?

vendredi 5 septembre 2014

FESA is back !

Sarah's Fall Essentials Sewalong is back! Basically, FESA consists in making warm, cosy and easy to wear garments for Fall, and as there are several categories you can choose to make any garment you like and as many as you like...which means that pretty much any sewist can join in with whatever she (or he) is making between September 1st and November 30th! Pretty cool, isnt'it?


The only thing I managed to me make last year was Wearing History's overalls, which did not turn out so great...but at least I see now what I must do to make them better!

This year, however, I feel like I could be more productive during these 3 months (yayyyyy for learning to knit!), so here are my plans :

  • In the "Fabulous Frocks" category, a "Goth-ish" Moneta, which I'm going to make in a lace print over beige background jersey for the skirt, and plain black jersey for the top (version 3, with the 3/4 sleeves) ;
  • In the "Chic Chemises for Cool Climates" category, Andi Satterlund's Aiken sweater, most likely in Cascade Lana d'Oro (in color 1036 or 1058 H, not sure yet)
  • In the "Fashionable Foundations for Frosty Weather" category, a Chataigne skirt (following Estelle's tutorial for turning Deer and Doe's Chataigne shorts into a skirt), in a brown wool mix I have in my stash
Well, that makes three garments, let's see if I'll be able to make all of them!

Interested in FESA? Then pay a visit to Sarah's blog Rhinestones and Telephones if you want to learn more about it and join in!

mardi 29 juillet 2014

Outfit Along : completed!

Hi all, I've finally completed both my cardigan and dress for the outfit along!


I look slightly stupid on that pic. Dunno why but my boyfriend wasn't very inspired. He could at least have told me I was looking that dumb!

I won't go over the cardi once more as you've already seen it in a previous post, but here are a few facts about the dress :
This is Colette Pattern's Hawthorn dress and I've made the sleeveless version, in a navy swiss dot cotton underlined (for the bodice) and lined (fort the skirt) in a navy cotton voile.

Sorry for the crappy pictures, didn't have the time to snap anything better...


But, you guys...THIS MUST BE MY FAVORITE OF ALL THE THINGS I'VE MADE SO FAR!!!
I mean, this is the first time I sew something (relatively) complicated and manage to get perfectly finished seams everywhere! My facings have been finished with a mock overlock stitch and then catchstitched to the (under)lining, same goes for my hem, I made a faux waist stay, finished my armholes with piping, used French seams everywhere I could...it's almost as beautiful on the inside as on the outside! (check my FlickR if you want to see the details!)
On top of that, the fit is spot on (although I was unsure about it after making 2 muslins, I finally cut a size 6 with no alterations) and this is a perfectly office-friendly garment.

However, even if this dress, due to its color and clean lines, is definitely cake material, it would be very easy to add some frosting to it with the right accessories and make it a perfect outfit for an evening out or even fancier occasions! I can already imagine wearing it with green or pink...I'll have to knit more Myrnas to pair with it! And I think it's definitely going to be worn a lot!

To conclude, I'd just like to thank Andi and Lauren for organizing the Outfit Along, it was fun!

mardi 15 juillet 2014

Outfit Along - Dress Progress

Hi folks, hope you had a lovely weekend! 
I personally had a lovely 3-days weekend (July 14th being our national day here in France) and coud really make some progress on my Outfit Along dress.


It's not easy to photograph a navy dress on a purple dress form, but there you have it! The only things left to do are finishing the armscyes, creating the buttonholes, making my fabric-covered buttons, hemming and catch-stitching the facing on to the lining/underlining fabric. I think the 15 days ahead should be enough to do this!


Look, I'm making a faux waist stay (thank Anna for her tutorial!)

Stay tuned for the final Outfit Along posted, it should come soon (or so I hope)!

mardi 22 avril 2014

Sew For Victory : in progress!

Hi everybody, here's a little update on my Sew For Victory project! It wasn't easy to start (not due to the pattern itself but rather to my tight schedule...), but it looks like we'll finally get there on time!

Come on. Go ahead. HAVE A GOOD LAUGH at this awesome fabric I'm using for a muslin! I guess is was originally intended to make bed sheets or duvet covers for kids, but it also happened to be close enough in terms of drape/body, to my fashion fabric. And it was cheap.

Self-drafted patch pockets with flaps. I know, my pocket flaps are half disapearing under my waistband and in the side seam, and I could hardly put three fingers in my pockets. But don't worry, I made new pattern pieces and the final pockets should allow me to use them for realz.

And here's my first attempt at a lapped zipper! A bit wonky but I think I got the gist of it. Anyway, I'll probably end up making a hand-picked lapped zipper, as I always trust my hand-sewing more than my sewing machine when it comes to being precise. And hand-sewing is all the more vintage, don't you think?
I actually completed this muslin this weekend, and I'm pretty happy to say it seems to fit without any alterations apart from those I had already made - lengthening the skirt and slashing-and-spreading to make it more flared. I did'nt get much sewing done over this Easter weekend, between eating chocolate and attending a B-movie festival taking place in my city, but I still managed to trace my pattern and cut my fashion fabric...and as the Ginger skirt is a quick make, I hope I'll finish it before April 30th! Fingers crossed!

mardi 16 juillet 2013

First UFO : finished at last!

Hi folks!
Remember the Lonsdale dress I mentioned in this post? Well, it's over now!


As I said last year, I first thought, as I'd read before that Sewaholic caters for pear-shaped ladies, that i'd need an FBA, not thinking of myself as pear shaped. However it turned out that what I needed was more room at the waist. I therefore proceeded to add whatever was needed, made 2 bodice muslins that didn't fit...and then, before I knew it, my holidays were over, and the time to wear breezy summer dresses was gone. So I stuffed my muslins away and worked on some Fall sewing.
But...I didn't want to call it a day! So, a bit more than two weeks ago, I took the most recent of my 2 muslins and tried it on again. As it was still too tight at the waist, and I didn't want to bother altering my traced pattern one more time, I decided to re-trace the whole bodice entirely, grading up from a size 6 at the bust, to a size 8 at the waist and hips. And, lo and behold, the fit of my 3rd muslin was much better!
Once that matter was settled, putting the whole dress together was a really quick and pleasant job. The only other alteration I made was to move the loops to the side a little bit, so the straps didn't cover my back tat.

At first I wanted to finish all the seams in the skirt with bias strip, but I finally just finished the center back seam and the zipper this way, using a cute anchor print bias trim. The other seams are just turned under and stitched, which is probably going to be my new favorite seam finish for light fabrics. I also handpicked the zipper and I have to say I really love that way of attaching zippers! I'm still a bit awkward with my machine when it comes to attaching zippers (remember this epic invisible zipper fail on my Lily dress?) and this technique allows me to get as close as I can to an invisible zipper (even if it's not an invisible zipper per say).
Here, you can see the anchor print bias trim and the lace-trimmed hem. Sorry about the flash, but if I hadn't used it you couldn't have seen the lace!

I also wanted to finish the hem with lace, which is probably not the best idea I ever had. It just took AGES. And although it doesn't show unless you have your nose sticked to it, it looks like weird scalloped stitches  on the right side of the dress (er...let's just say it's an intentional design effect, shall we?). Lesson learned, and note to myself : If you're not patient enough to make it fancy, then keep it simple. And if you want to do this kind of finish, underline, so it doesn't show on the outside.

And now, a few technical details : 

Fabric : 100% navy polkadot cotton lawn
Notions : zipper, bias trim, lace trim
Any difficulties ? None whatsoever, although I tried to make things complicated when I should have kept them simple (lace-trimmed hem vs simple hem).
Wear again ? Sure, as often as possible! This is a great dress for week-ends, easy to dress up or down.
Make again ? Not sure yet ...but I might, considering how quick it is to make!I just have to find the right fabric!

Other outfit details : 
Hair flowers from Claire's (big white rose) and Paradirama (orange orchid)
Belt and handbag from H&M's
Bluebird sandals from Miss L Fire.
Chiffon scarf (on handbag) from Rockahula Isla Retro Delights
Vogue sunglasses from my local optician, a few years ago.

jeudi 4 juillet 2013

Smooth sailing pants : how to turn the side zipper into a side button closure

Better late than never...Sorry for not posting at all in June but my work schedule was very, very tight and it was therefore harder to find time for blogging! Anyway, here you go! Watch out, this is a photo-heavy post!

I’ve already made a wintery, dark green wool version of the Smooth Sailing pants. I had hardly finished it when I started thinking, why not make one summer version? Or 2, or 3…? And then, why not using buttons instead of a zipper closure? Thing is, I didn’t know how to do that…however, after a bit of asking around and drafting, I figured out how to do it, and I can now propose you a little tutorial about how to convert a side zipper into a side button closure.
My method might not be very academic, but I can still share it with you, for what it’s worth. Hope you enjoy it!

How to convert a side zipper into a side button closure?

To begin with, we are going to draft a little pattern piece to make the button placket. Here are the measurements you will need to draw it:
  • Length (I chose the same length as the zipper advised in the pattern, i.e. 12cm/ 6in) – be careful to include your seam allowance in the length )
  • Width : you will have to take into account the diameter of your buttons, plus the space you want on each side of the buttons, plus the seam allowance. My pattern piece is thus 6cm wide at its widest point.
  • Button diameter (here, 2cm).

Here is my pattern. My buttons were 2cm wide and I decided to leave 1 cm on each side, plus one more cm (1/2 in) as a seam allowance. There are 2 cm between the top button and the upper edge of the pattern, seam allowance included, and 1.5 cm between each button. More space is left – about 3 cm – between the bottom button and the lower edge of the pattern. All in all, I used 5 buttons, including the one at the waistband.

You will cut 4 of these pattern pieces (following the grainline of the fabric), 2 of which being reinforced with fusible interfacing.


Then, take 2 of each pattern pieces - one of them interfaced, but not the other, and sew them, right sides together, following the curved line.

Grade your seam allowances, notch when needed, and then turn them to the right side.

Then proceed to put your pants together. Follow the pattern instructions until you have to insert the zipper.

Take your button placket pieces. The piece on which you will sew the buttons is going to be attached to the left back part of the pants, the other to the left front.
Pin one of your button plackets to the left front part of pants, right sides together, as shown below.


Stitch, then flip it to the wrong side of your pants.

Press, then trim the seam allowance that will end up facing the wrong side of the fabric...
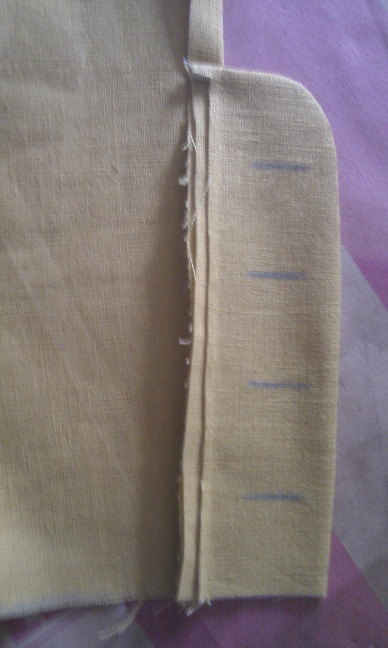
Flip to the wrong side once more...


Topstitch...


Here’s how it’s going to look like, once the buttonholes are made :

(Yes, I know, I handworked my buttonholes somewhat hastily and it shows...)
Now, take the back left part of your pants and attach the piece on which the buttons will be sewn. Pin it right sides together and stitch. Then, as you did previously, fold your seam allowance to the wrong side of your fabric and topstitch in place.

Here’s how it looks, once the buttons are sewn in place :


You can now proceed with your sewing, following pattern instructions, until you get to the waistband part.

As one of the sides of your button placket sticks out (the one which is going to carry the buttons), you will have to cut the waistband longer so you encase it within your waistband. As for me, I cut a 32 in. length for the waistband, but if you are not sure, the better is to make it longer than needed and then cut the excess. Interface your waistband as instructed on the pattern and carefully mark some folds, this will help you sew it in place afterwards :
You will first fold your waistband in the middle, lengthwise, and press. Then, you will fold the raw edges of your waistband, first at each end - fold about 1 cm towards the wrong side of your waistband and press. Do the same with the lowest part of the waistband, which will be attached to your pants. Then stitch your waistband as instructed on the pattern. Remember to tuck the raw edges inside at each end of your waistband and stitch it shut. You can topstitch your waistband if you like. I chose not to make the belt loops, so that the side button closure could be the main center of interest.

(Sorry, I stupidly forgot to take pictures to illustrate that part.)

Your pants will now be close to finished! All you’ve got left to do is make your buttonholes (4 on the placket + 1 on the waistband), either by machine or by hand, and then sew your buttons in place.
Watch out where you sew your buttons : when I made a muslin of my side-buttoned pants, I had overlapped the two parts of my button placket (buttonholes over buttons) and made marks with chalk inside the buttonholes to mark the spot for the buttons. Which I sewed, then, right on the middle of the lines I had drawn, only to find out later that the buttonholes were actually pulling on the buttons and that the 2 parts of my button placket did not overlap anymore - there was a gap of about 5mm where everything should have overlapped smoothly.
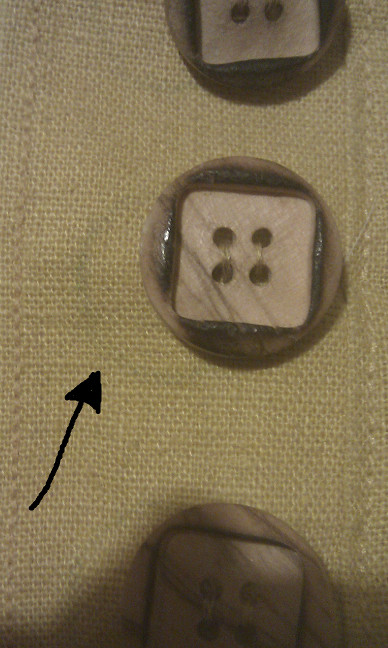
To avoid this, when I sewed the final garment, I did not sew my buttons right in the middle of the chalk lines - I slightly pushed them to the right. The picture below shows that the buttons are not quite sewn on the spot originally made for them (the little arrow is pointing that mark, which you can barely see).

As a result, the 2 parts of my button placket overlap just as they should and there is no gap (see below!).

When you’ve reached this point, all you’ve got left to do is...well, hem your pants (with or without cuffs), wear them and be happy!      


Side note : I really can't understand why, but my cat keeps chewing at the buttons of these pants and trying to bite them off whenever I'm not looking. I swear, even when I'm just sitting on the couch, she's trying to eat those damn buttons - and she even succeeded in splitting one of them in 2. B****.